If you’d like to have a simple solution for managing all the secrets you’re using in your Ansible Playbooks, keep reading on. Bitwarden’s Secrets Manager provides an Ansible collection, which makes it very easy to use this particular Secrets Manager in Ansible Playbooks. I’ll show you how to set up a free Secrets Manager account in Bitwarden. Then I’ll walk you through the setup in an example Ansible Playbook.
YouTube Video version
I’ve also recorded a video version of this article. If you prefer a video, you can find it here.
Bitwarden Secrets Manager
You’ll need a Bitwarden account. If you don’t have one, navigate to Bitwarden and sign up for a Free account. Next, log in to your account. On the navbar on the left-hand side, click the Secrets Manager link. If you haven’t yet activated it, you’ll be encouraged to do so:
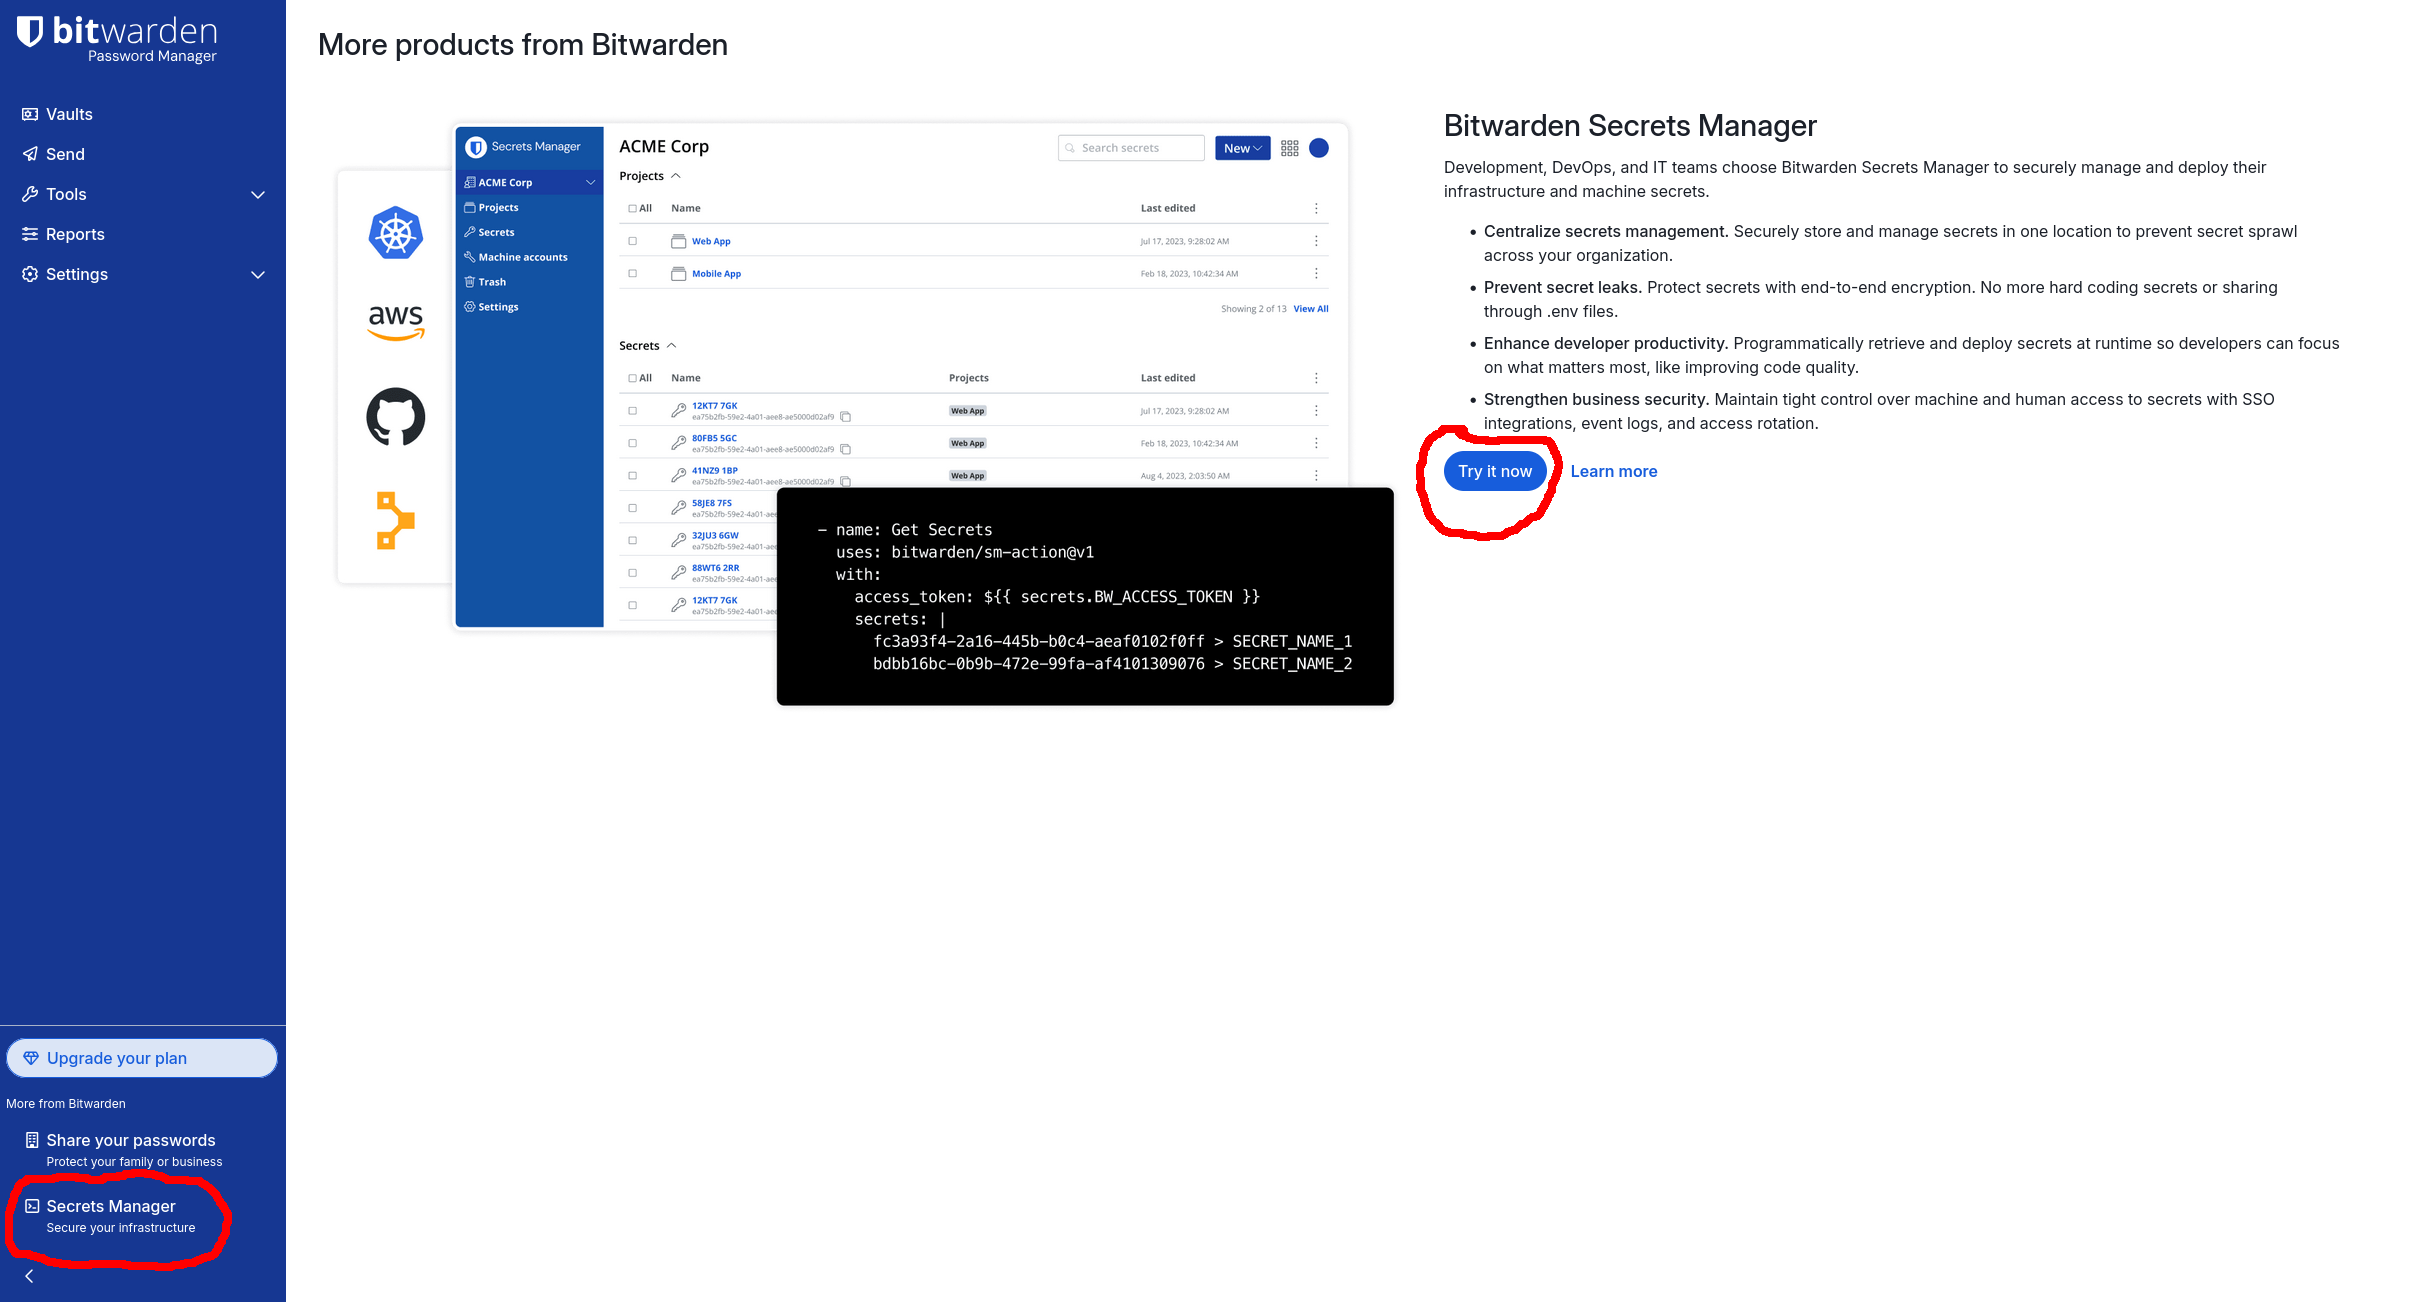
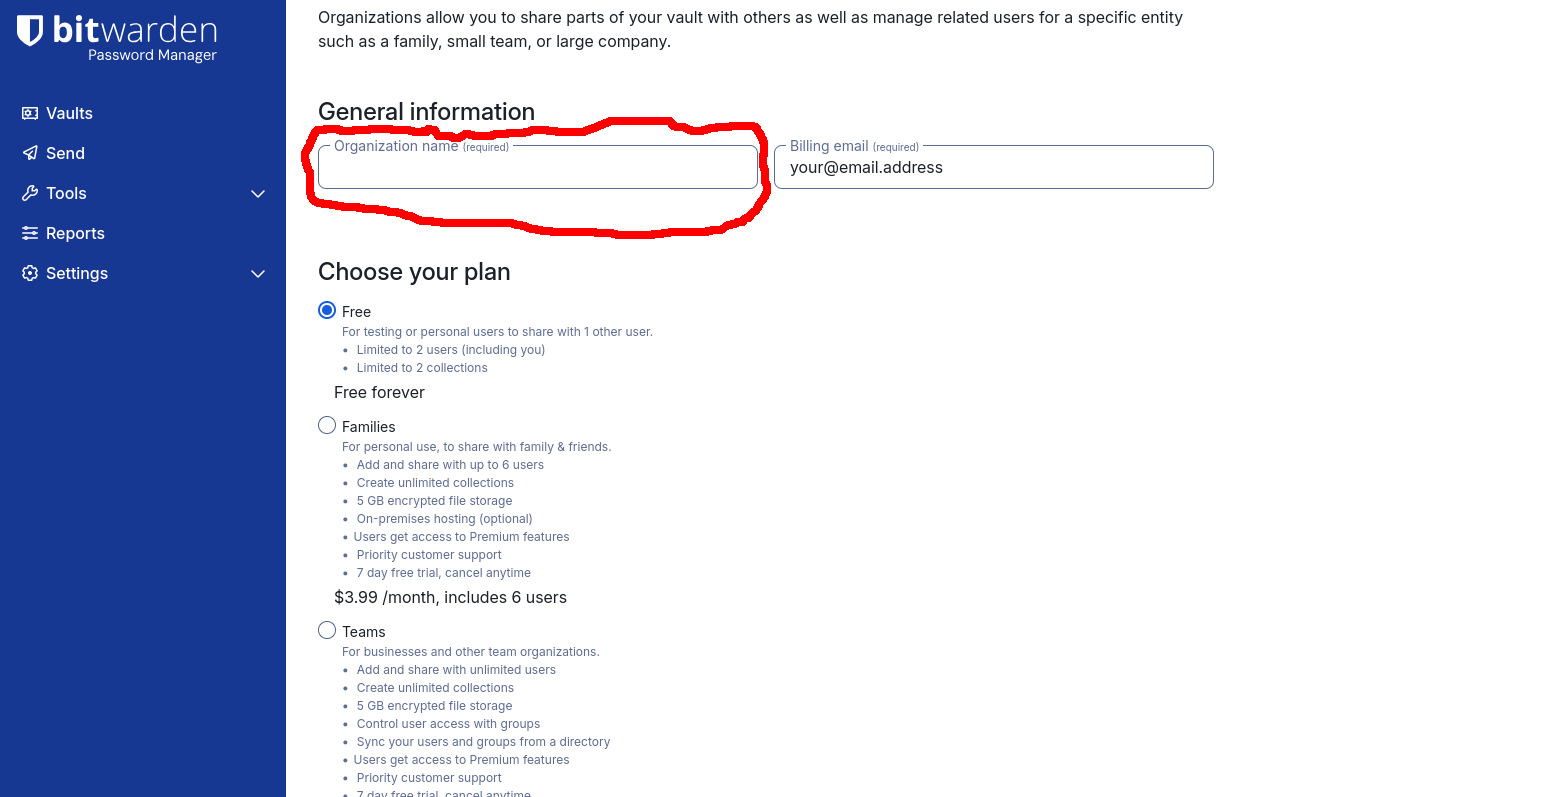
Then click the Try it now button. You’ll be taken to a page where you have to create a Bitwarden Organization — it’s a prerequisite for activating Secrets Manager. Choose whatever Organization name you want. Choose the Free plan, and at the bottom, remember to check the Subscribe to Secrets Manager checkbox and click Submit:
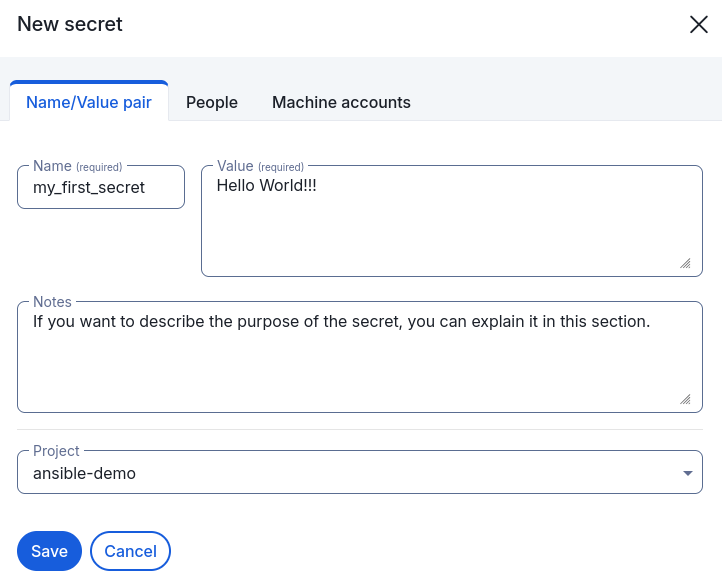
Ok, then navigate to Projects and create a new Project by clicking the +New
Project button and giving it a name (e.g., my_first_project). Next, click
the +New Secret button and create a new secret with a name hello_bws and
the value Hello World!!!.
Setting up Python venv
Since Ansible is written in Python, we’ll create a Python virtual environment to run Ansible Playbooks. You only need to create it once and use it for running all your Playbooks:
$ mkdir venvs
$ python3 -m venv venvs/ansible
$ ls venvs/ansible/
$ bin  include  lib  lib64  pyvenv.cfg
$ source venvs/ansible/bin/activate
(ansible) $
You also need to install Ansible and the bitwarden-sdk Python packages in your
venv using pip. At the time of writing this article, there was no pre-built
bitwarden-sdk package for Python 3.13 (the Python3 present in Debian Trixie).
So simply installing it using pip wouldn’t work. Try installing it yourself —
there’s a good chance that it’ll work by the time you read this article. Or
maybe you’re using a different distro/operating system, and the bitwarden-sdk
package is prebuilt for that version of Python. If, however, it doesn’t work,
read the next section in which I’ll walk you through building the package
yourself.
Building the bitwarden-sdk package
If you need to build bitwarden-sdk package, make sure you have the recent
Rust toolchain installed. If you haven’t installed it yet, navigate to Rust’s
starting page and execute the curl command that’ll
install Rust for you. The toolchain will be installed in your home directory
(it won’t mess up your operating system’s Rust installation if you already have
one installed system-wide).
At this point, you have to install npm (can be system-wide) and the maturin
Python package (in your venv). So for Debian or a Debian derivative (e.g.,
Ubuntu), run:
(ansible )$ sudo apt install npm
...
(ansible) $ pip install maturin
...
And then clone the bitwarden-sdk repo and build the package:
(ansible) $ cd
(ansible) $ $ git clone https://github.com/bitwarden/sdk-sm.git
...
(ansible) $ cd sdk-sm
(ansible) $ npm install
...
(ansible) $ npm run schemas
...
(ansible) $ cd languages/python/
(ansible) $ maturin build
At this point you should have the bitwarden-sdk package in your venv.
Try importing the BitwardenClient class from the bitwarden_sdk package and
see if it works:
(ansible) $ python3
...
>>> from bitwarden_sdk import BitwardenClient
>>>
The class got imported successfully, so the bitwarden-sdk package is ready to
be used in your Ansible Python venv.
Machine Account and Access Token
We’ll write a simple Ansible Playbook, which will fetch the hello_bws secret
from Bitwarden Secrets Manager and print it to the screen using
ansible.builtin.debug module. For that, we’ll need the following:
- A Bitwarden Secrets Manager Project with a
hello_bwssecret. - A Machine Account with the
readpermission for the Project created above. - An Access Token for the Machine Account.
We’ve already created the Project with the Secret in the previous section.
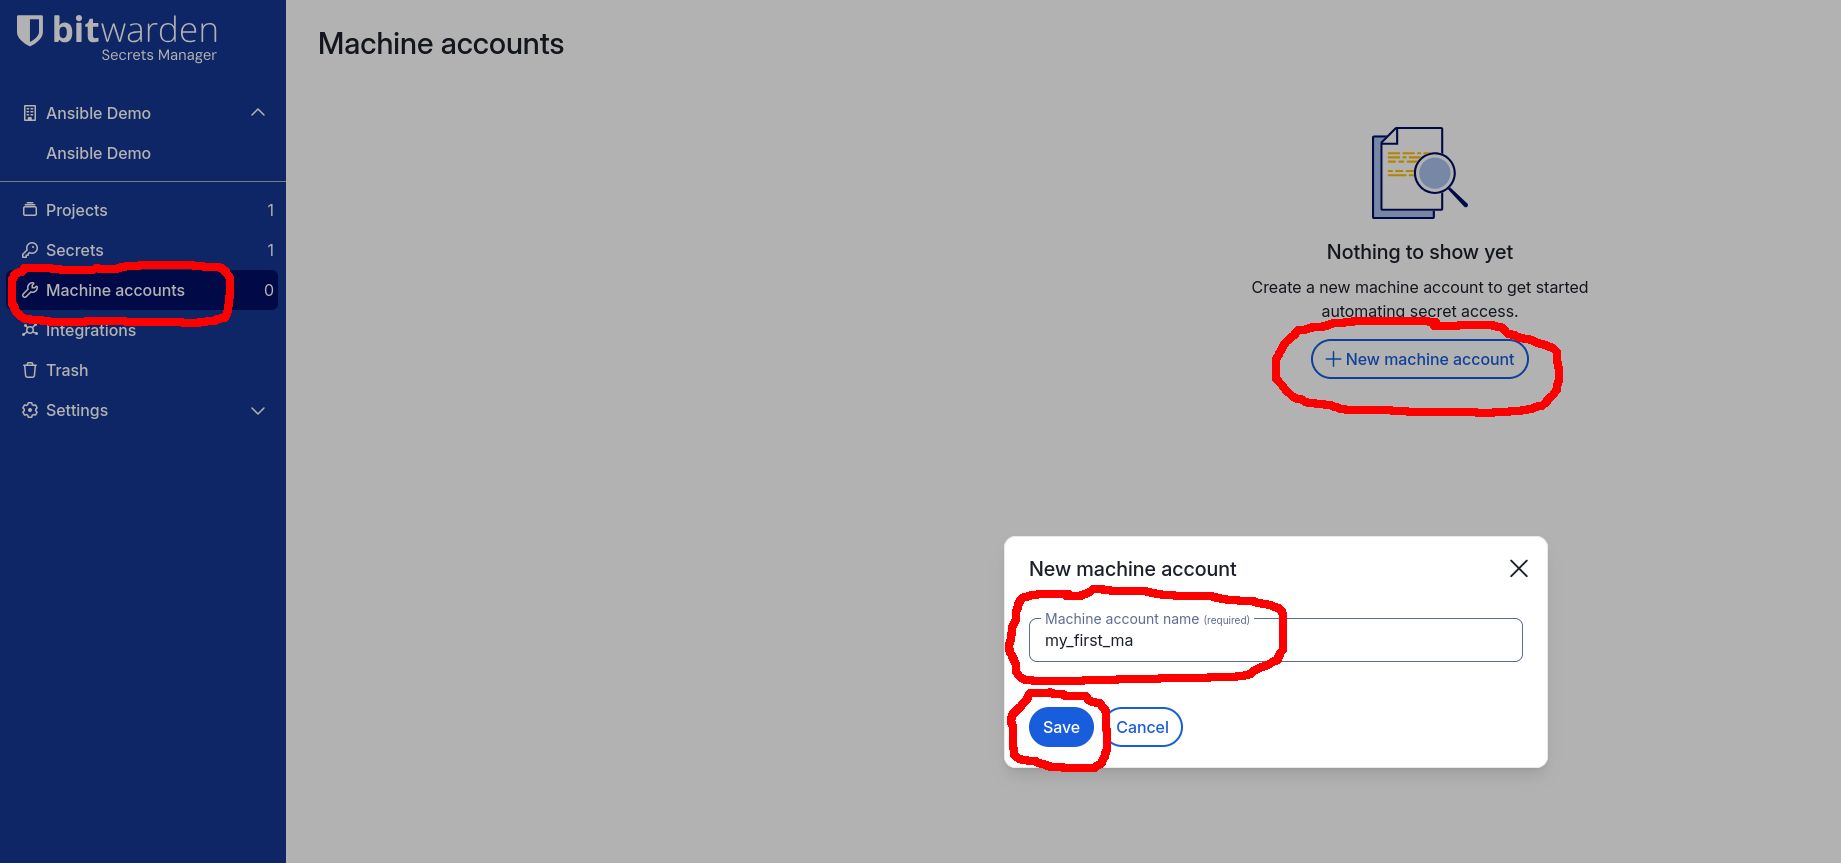
Now, let’s create a Machine Account and an Access Token for it. First, navigate
to the Machine accounts page on the left-hand-side navbar and click the +New
Machine Account button. In the New machine account dialog, enter the name of
the Machine Account (e.g., my_first_ma) and click the Save button:
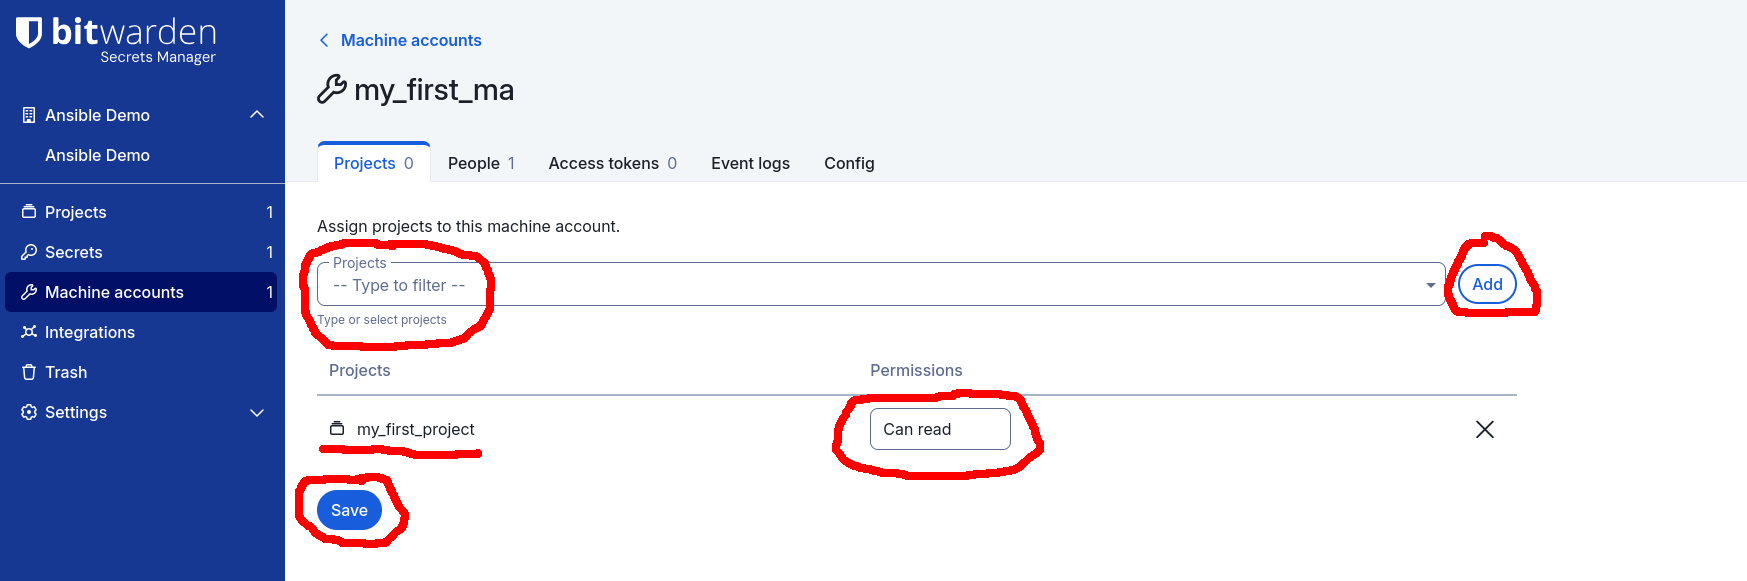
Next, assign the can read permission to the my_first_project Project by
selecting the my_first_project in the Projects drop-down menu, click the
Add button and then click the Save button:
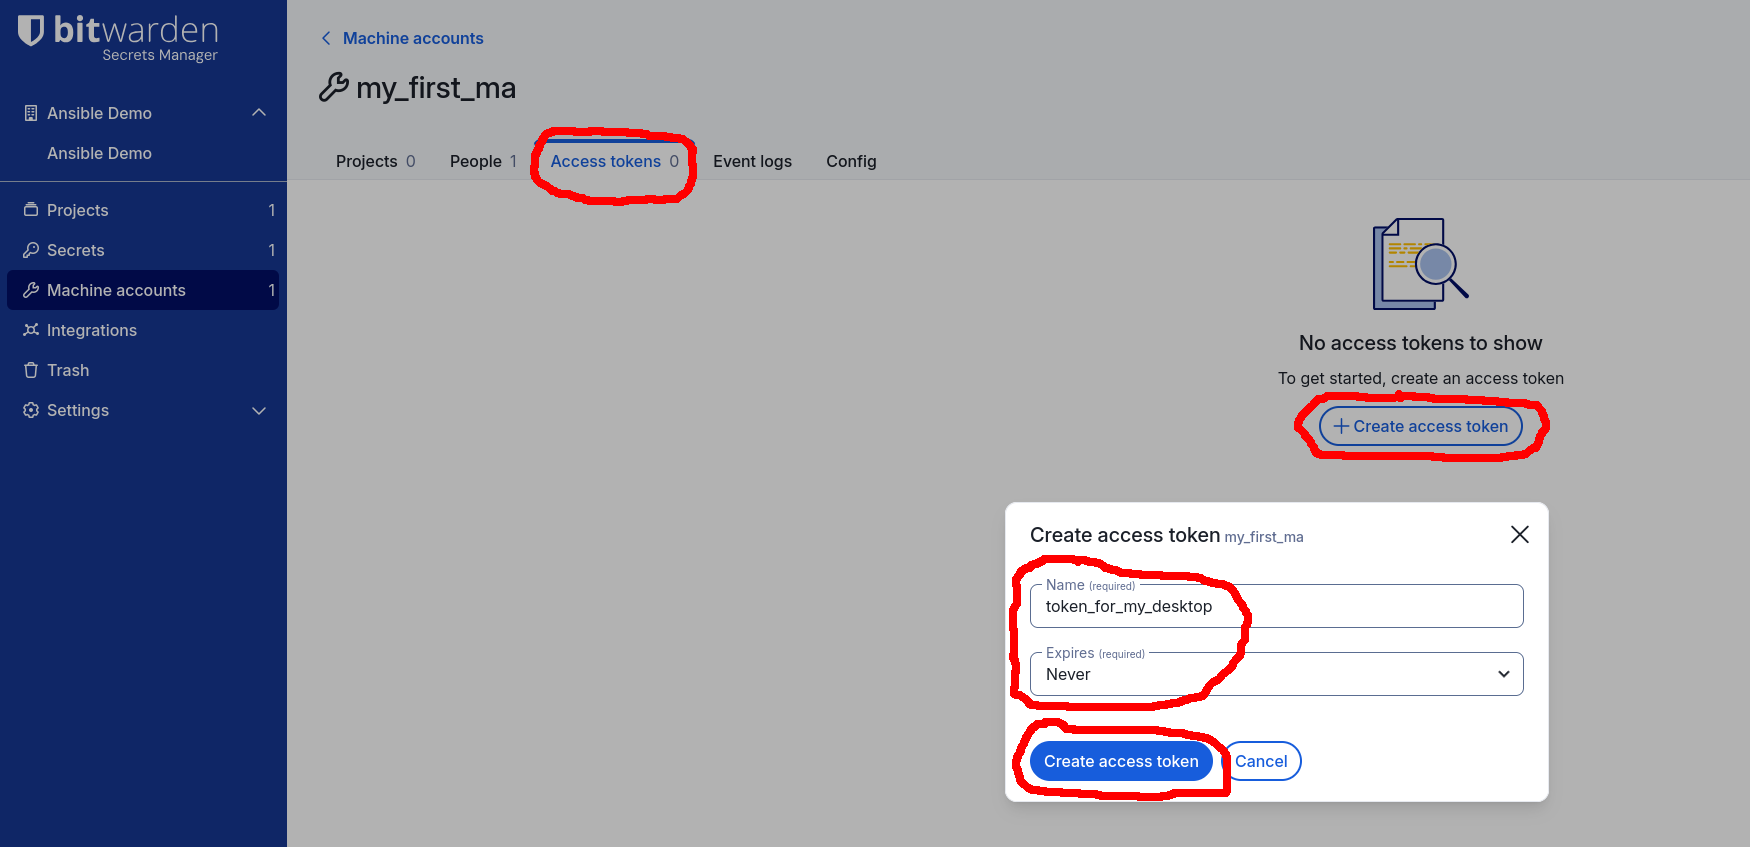
Finally, create an Access Token for the Machine Account and save it (just for
now) in a .envrc file. While on the Machine Account’s page, navigate to the
Access tokens tab then click the +Create access token button. In the
Create access token dialog, enter the name of the Access Token (e.g.,
token_for_my_desktop). You may also set the expiration time, if you want.
Click the Create access token button:
On the next screen, you’ll see the actual access token. You can copy it to your
clipboard by clicking the Copy token button. Now let’s create a new directory
for the Ansible Playbook and save the Access Token in a .envrc file:
(ansible) $ cd
(ansible) $ mkdir bws-ansible-playbook
(ansible) $ cd bws-ansible-playbook
(ansible) $ echo "export BWS_ACCESS_TOKEN=<paste the token from your clipboard" >> .envrc
(ansible) $ . .envrc
The important detail above is to remember the export before the env variable.
You’ll need to make that token visible to a child process executed in this
shell. You run Ansible Playbooks using the ansible-playbook command. This
spawns a new child process, which needs the token.
Now, create a simple Ansible Playbook file. Name it, e.g., hello_bws.yml and
paste the following content into it:
---
- name: Ansible with Bitwarden Secrets Manager Demo
  hosts: localhost
  tasks:
    - name: Print demo secret
      ansible.builtin.debug:
        msg:
          - "The demo secret is: {{ lookup('bitwarden.secrets.lookup', 'UUID_OF_YOUR_SECRET') }}"
Remember to replace the UUID_OF_YOUR_SECRET placeholder with the actual UUID
of the hello_bws secret. For example, my secret has the UUID
01bd0588-be13-46b0-bd63-b3e701599e5b:
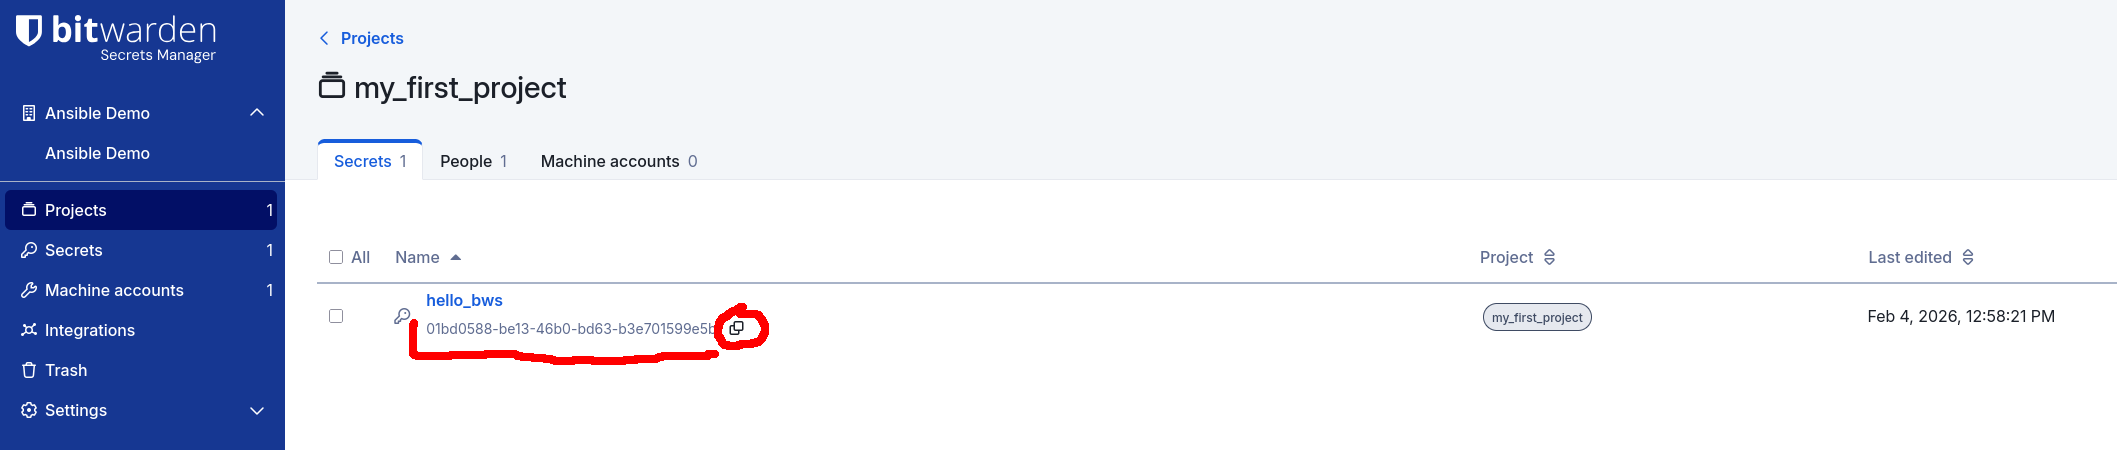
So my playbook looks like this:
---
- name: Ansible with Bitwarden Secrets Manager Demo
  hosts: localhost
  tasks:
    - name: Print demo secret
      ansible.builtin.debug:
        msg:
          - "The demo secret is: {{ lookup('bitwarden.secrets.lookup', '01bd0588-be13-46b0-bd63-b3e701599e5b') }}"
And now run the playbook:
(ansible) $ ansible-playbook hello_bws.yml
[WARNING]: No inventory was parsed, only implicit localhost is available
[WARNING]: provided hosts list is empty, only localhost is available. Note that the implicit localhost does not match 'all'

PLAY [Ansible with Bitwarden Secrets Manager Demo] *************************************************************************************************************************************************************************************

TASK [Gathering Facts] *****************************************************************************************************************************************************************************************************************
ok: [localhost]

TASK [Print demo secret] ***************************************************************************************************************************************************************************************************************
ok: [localhost] => {
    "msg": [
        "The demo secret is: Hello World!!!"
    ]
}

PLAY RECAP *****************************************************************************************************************************************************************************************************************************
localhost                  : ok=2    changed=0    unreachable=0    failed=0    skipped=0    rescued=0    ignored=0
Beautiful! We’ve successfully fetched the secret from Bitwarden Secrets Manager and printed it to the screen using Ansible.
Now it’s time to take better care of your Access Token.
The CLI Password Manager: pass
Install the pass CLI password manager. E.g., on Debian or Ubuntu, run:
$ sudo apt install pass
On macOS, use Homebrew to install pass:
$ brew install pass
This will also pull in the gpg CLI tool. If you already have gpg installed
and are not using it for anything else, you can also use your existing key for
pass. Look up your key’s ID using:
$ gpg --list-secret-keys --keyid-format LONG
For example, for me:
$ gpg --list-secret-keys --keyid-format LONG
% gpg --list-secret-keys --keyid-format LONG
/home/patryk/.gnupg/pubring.kbx
-------------------------------
sec#  rsa4096/1ABFA401CCAA707A 2016-07-29 [SC] [expires: 2031-04-27]
      41726E33A5844A77D2EF1DAF1ABFA401CCAA707A
uid                 [ultimate] Patryk Cisek <patryk@cisek.email>
uid                 [ultimate] Patryk Cisek <patryk@cisek.ca>
uid                 [ultimate] Patryk Cisek <patryk@debian.org>
ssb>  rsa2048/66868F362A1C8ECC 2020-04-20 [E] [expires: 2026-03-12]
ssb>  rsa2048/5C986A941B6C82F5 2020-04-20 [S] [expires: 2026-03-12]
ssb>  rsa2048/8FF8D4FAAC067ACB 2020-04-20 [A] [expires: 2026-03-12]
So my key ID is 41726E33A5844A77D2EF1DAF1ABFA401CCAA707A.
But if you’re not yet using gpg, just create a new key. For example,:
$ gpg --full-gen-key
gpg (GnuPG) 2.4.7; Copyright (C) 2024 g10 Code GmbH
This is free software: you are free to change and redistribute it.
There is NO WARRANTY, to the extent permitted by law.

Please select what kind of key you want:
   (1) RSA and RSA
   (2) DSA and Elgamal
   (3) DSA (sign only)
   (4) RSA (sign only)
   (9) ECC (sign and encrypt) *default*
  (10) ECC (sign only)
  (14) Existing key from card
Your selection?
Please select which elliptic curve you want:
   (1) Curve 25519 *default*
   (4) NIST P-384
   (6) Brainpool P-256
Your selection?
Please specify how long the key should be valid.
         0 = key does not expire
      <n>  = key expires in n days
      <n>w = key expires in n weeks
      <n>m = key expires in n months
      <n>y = key expires in n years
Key is valid for? (0)
Key does not expire at all
Is this correct? (y/N) y

GnuPG needs to construct a user ID to identify your key.

Real name: pass CLI
Email address:
Comment:
You selected this USER-ID:
    "pass CLI"

Change (N)ame, (C)omment, (E)mail or (O)kay/(Q)uit? O
We need to generate a lot of random bytes. It is a good idea to perform
some other action (type on the keyboard, move the mouse, utilize the
disks) during the prime generation; this gives the random number
generator a better chance to gain enough entropy.
We need to generate a lot of random bytes. It is a good idea to perform
some other action (type on the keyboard, move the mouse, utilize the
disks) during the prime generation; this gives the random number
generator a better chance to gain enough entropy.
gpg: directory '/home/dev_sec_ops/.gnupg/openpgp-revocs.d' created
gpg: revocation certificate stored as '/home/dev_sec_ops/.gnupg/openpgp-revocs.d/9515EEA3A6E5635F65CB3E73F959DB88FE2C2F37.rev'
public and secret key created and signed.

pub   ed25519 2026-02-05 [SC]
      9515EEA3A6E5635F65CB3E73F959DB88FE2C2F37
uid                      pass CLI
sub   cv25519 2026-02-05 [E]
Here, the new key ID is 9515EEA3A6E5635F65CB3E73F959DB88FE2C2F37.
Next, initialize the pass CLI password manager using the new key ID:
$ $ pass init 9515EEA3A6E5635F65CB3E73F959DB88FE2C2F37
mkdir: created directory '/home/dev_sec_ops/.password-store/'
Password store initialized for 9515EEA3A6E5635F65CB3E73F959DB88FE2C2F37
Now, copy the Access Token from your .envrc file to the clipboard and then
add it to pass:
$ pass insert bws/token_for_my_desktop
mkdir: created directory '/home/dev_sec_ops/.password-store/bws'
Enter password for bws/token_for_my_desktop:
Retype password for bws/token_for_my_desktop:
Now you can, at any time, print out the Access Token using:
$ pass bws/token_for_my_desktop
Now replace the content of your .envrc file with the following:
export BWS_ACCESS_TOKEN=$(pass bws/token_for_my_desktop)
This way, the next time you run . .envrc, your shell will run
pass bws/token_for_my_desktop and set the BWS_ACCESS_TOKEN environment
variable to the value of the token_for_my_desktop entry in your password
store.